

 640
640
Dust collecting on the air filter can cause the internal temperature of the projector to rise, which can lead to problems with operation and shorten the service life. Please clean the air filter immediately if a message is displayed on the screen. If dust cannot be removed from the air filter even after cleaning, replace the air filter with a new one. If washing the air filter in water, air filter replacement is recommended after washing the air filter two times. The air filter performance after washing may be reduced compared with its initial performance.
1. Turn off the projector.
2. Remove the air filter cover by pushing the tabs of the air filter cover upward, removing them from the hooks of the projector, and opening it in the direction of the arrow in the below diagram.

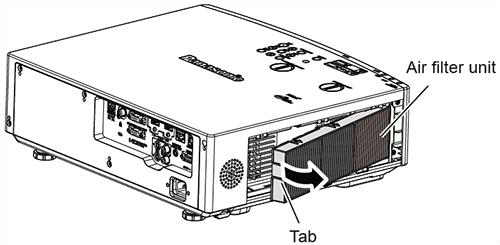
3. Remove the air filter unit by putting your finger on the left side of it, opening it in the direction of the arrow in the below diagram, and removing it.
4. After removing the air filter unit, remove the foreign objects and dust in the air filter unit compartment (if any).
5. Clean the air filter with a vacuum cleaner.
6. If dust cannot be removed, wash the air filter unit using the following steps:
- a. Soak the air filter unit in cold or warm water and then lightly rinse it. Do not use cleaning tools, such as brushes, and hold the frame of the air filter unit when rinsing, not putting strong pressure on the filter.
- b. Rinse the air filter unit 2-3 times with fresh water. Insufficient rinsing may result in odors.
- c. Dry the air filter naturally in a well-ventilated place where there is little dust and no direct exposure to sunlight. Do not use any drying devices, such as dryers.
7. Attach the air filter to unit to the projector by attaching it from the right side and push the tab until it clicks. Take care not to remove the sponge on the side of the air filter unit.


8. Attach the air filter cover to the projector by placing it on the hooks of the projector and firmly pressing it closed until it clicks into place.


